If you’re like most of the folks I know, email is both a blessing and a curse. We’re buried in it.
But it doesn’t have to be that way.
Here are the four steps for letting Gmail do your heavy-lifting for you. (Be sure to click on the images to expand them.)
First, batching is critical.
Fans of Getting Things Done or the Four Hour Work Week remember how important batching is to enhancing productivity. That just means grouping similar tasks together for completion – like email. So instead of always checking your email, you’d designate a few times of the day to read and respond.
I’ve discovered that you can take this principle another step forward. Within your Inbox, you can group messages with similar actions needed so that you can process them more quickly.
Get started.
The first step is really easy. Just go to the Labs tab on your Gmail Settings and enable Multiple Inboxes and Superstars. Save your new settings.
Pick your stars.
Now, click over to the General tab in your Gmail Settings. Scroll down about midway until you see the Stars section.
You can pick from 12 different stars (or symbols) to apply to your messages. Just drag them to the In Use section to activate.
Then mouse-over each one that’s In Use to jot down its descriptor. For example, the middle one is called “red-bang.”
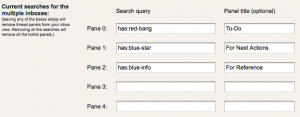
Tip: Pick a star for each major category of messages you want to keep in your Inbox. For example, I use the red exclamation for “To Do,” the blue star “For Next Actions,” and the blue i “For Reference.” You could also use different colors for separate clients or projects.
Pick your buckets.
Now, click over to the Multiple Inboxes tab in your Gmail Settings. This is where the magic happens.
You can customize up to 5 additional buckets for your Inbox.
Simply type “has:” and the star descriptor in the Search Query box. The panel title is optional, but I’ve noticed the headings help me stay focused.
Below this pane, you can also select how many messages to display in each box (I selected 10), and whether you want them to display above or below your regular Inbox (I picked below).
Save your settings, and click back to your Inbox.
Click to tidy.
To sort each of your messages into their bucket, simply click on the Star to the left of each message. Keep clicking until the appropriate star appears.
Once it’s been starred, you can archive it to remove it from your regular Inbox.
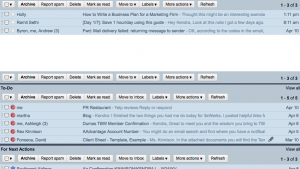
In just a few minutes, you can tidy up dozens of messages. Here’s what it looks like afterwards.
If you’ve read this far, I hope you found this information useful – and a tidy inbox!
Related Posts:
3 Gmail Plugins You Should be Using Right Now
Notes: This article first appeared in the Neovia Solutions newsletter. You can sign up here. Also, links to books include Amazon Affiliate information.


This is the BEST information. Thank you for sharing!